
Cap Embroidery Tips
Fixing the cap correctly is a key step in the embroidery process. You need to place the cap on the fixing ring and secure it with a clip to ensure that the cap is in the correct position, which will help to avoid mistakes during the embroidery process.
The use of clips to secure the cap is a recommended but not required method. The decision to use clips can be made based on personal experience and the construction of the cap, which will help avoid mistakes during embroidery.
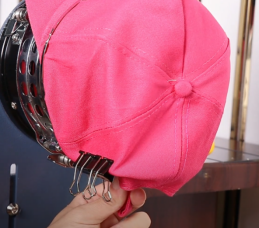
(1) make sure the center line on cap ring align with alignment
if not,you can loose the screws to adjust the direction.
unfasten the flexible metal band and posion it to the left of the cap ring
(2)connect the clasp to the cap ring latch and snap it into place,if you can't snap it into place,you need to make some adjustment.loose the screw and pull the latch to up,then tighten it .now you can connect the clasp to the cap ring latch easily
The use of clips to secure the cap is a recommended but not required method. The decision to use clips can be made based on personal.
When placing the cap on the embroidery machine, attention needs to be paid to the correct direction of rotation and how to lock the cap in position. By doing this correctly, you can ensure that the cap remains secure during the embroidery process.
When tracing on the cap, make sure to stay in the centre of the cap to avoid the needle breaking.
3D Puff Cap
3D puff embroidery can add a sense of dimension to a design and offers a cost-effective way to do so, requiring the use of materials such as puff, scissors and tape, and the design must be digitised to ensure that the embroidery is in the correct order.
3D embroidery is a technique that can add a sense of depth to a design. It creates a three-dimensional effect by adding puff to a cap, which not only provides customers with a unique product, but also increases profits. Below I will provide some practical tips for 3d Puff hat embroidery:
1.Choosing the correct colour of puff is crucial. You should choose a colour that matches the 3D part of the design. For example, if the 3D part of the design is red, then the colour of the puff should be red. This will ensure that the colour of the puff does not come through the design when the embroidery is finished.
2. The order of placement of the puffs and the machine settings need to follow the correct steps to ensure that the final 3D effect is as expected.
3.The embroidery machine needs to intervene manually when embroidering the 3D part in order to place the puffs at the right time.
4.Some puff will ooze out after the 3D cap embroidery is done. If you choose to remove the puff, you can use a heat gun or a lighter. The heat gun or lighter will shrink the puff and eliminate the protruding parts.